
When I first started blogging it was a requirement for my study abroad program in Italy in college. I wrote for a month (for class) and didn’t pick it back up again until after I graduated. I was starting from scratch with the simple idea of sharing everything I love from adventure to design. Other than a couple post ideas, a blog title and a yearning to write again I had absolutely no idea what to do. I’ve now been blogging for 4 years! One of those most frequently asked questions I receive are how did you start your blog and how do you make money from it. Blogging is all about connections so I had to share with all of you exactly how I started One Broads Journey and what is working.
Two things I did a lot of research on prior to starting a new blog were domain hosting and blog platforms. And I am SO HAPPY I did my research! It has made all the difference in my blogging experience and I hope it does the same for you.
If you’re already a blogger or looking to become one who blogs consistently with room for growth opportunities, and making money, WordPress is your golden ticket. WordPress is an amazing blogging platform with millions of users, however, you will still need somewhere to host it. This is where Bluehost comes into your plan. I will periodically update this post with new information and tips on what’s working and you can find more about making and saving money on my resources page.
Not sure what to write about?
The great part about a blog is you pick something you’re truly passionate about and get to share it with others. When you write about something you love, that will be the best-written articles out there.
- Travel
- Fashion
- Blogging
- Animals
- Health and Wellness
- Beauty
- Music
- Weddings
- Relationships
- AND so much more!
In this tutorial, you will learn not only Step by step instructions on How To Start A Blog On Bluehost + WordPress.Org but how to then Start Making Money from Your Blog.
Click Here to Start the Process
STEP #1
Choose Domain Hosting
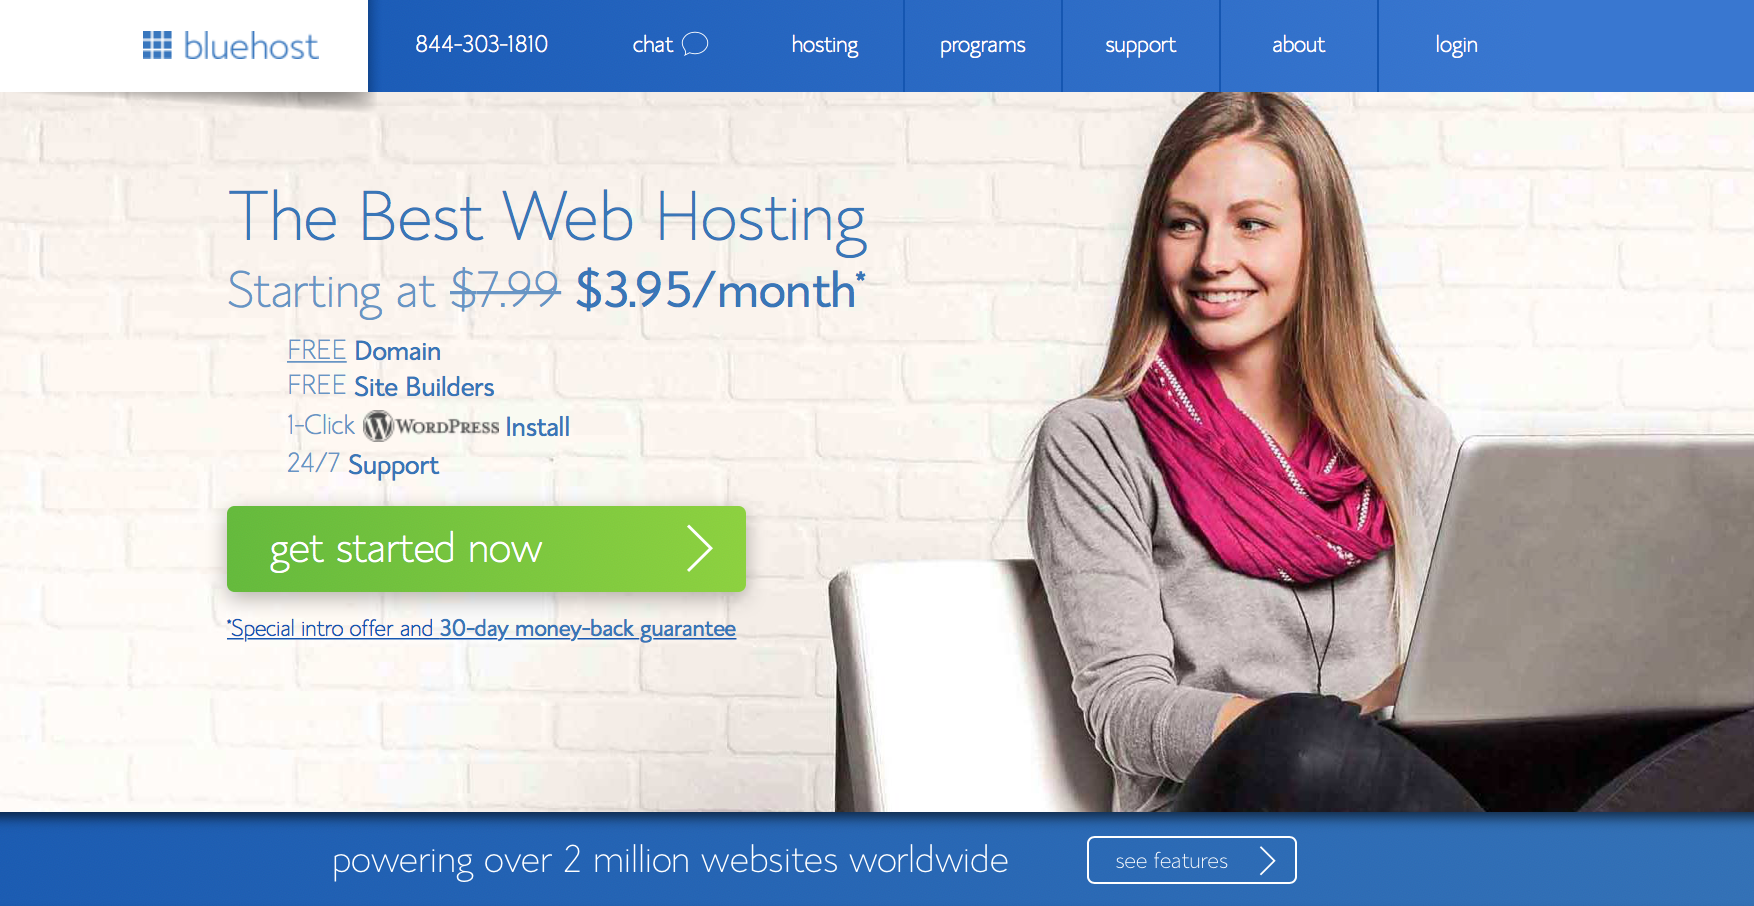
So you’ve named your newest baby (blog) and you’ve started compiling a list of all the things you want to write about. Now it’s time to register your domain, this simply means claim it as your on the internet. You can do this directly through Bluehost which makes the process much easier. Simply go to Bluehost.com and click the green “get started now” button; it will be the first thing you see.
STEP #2
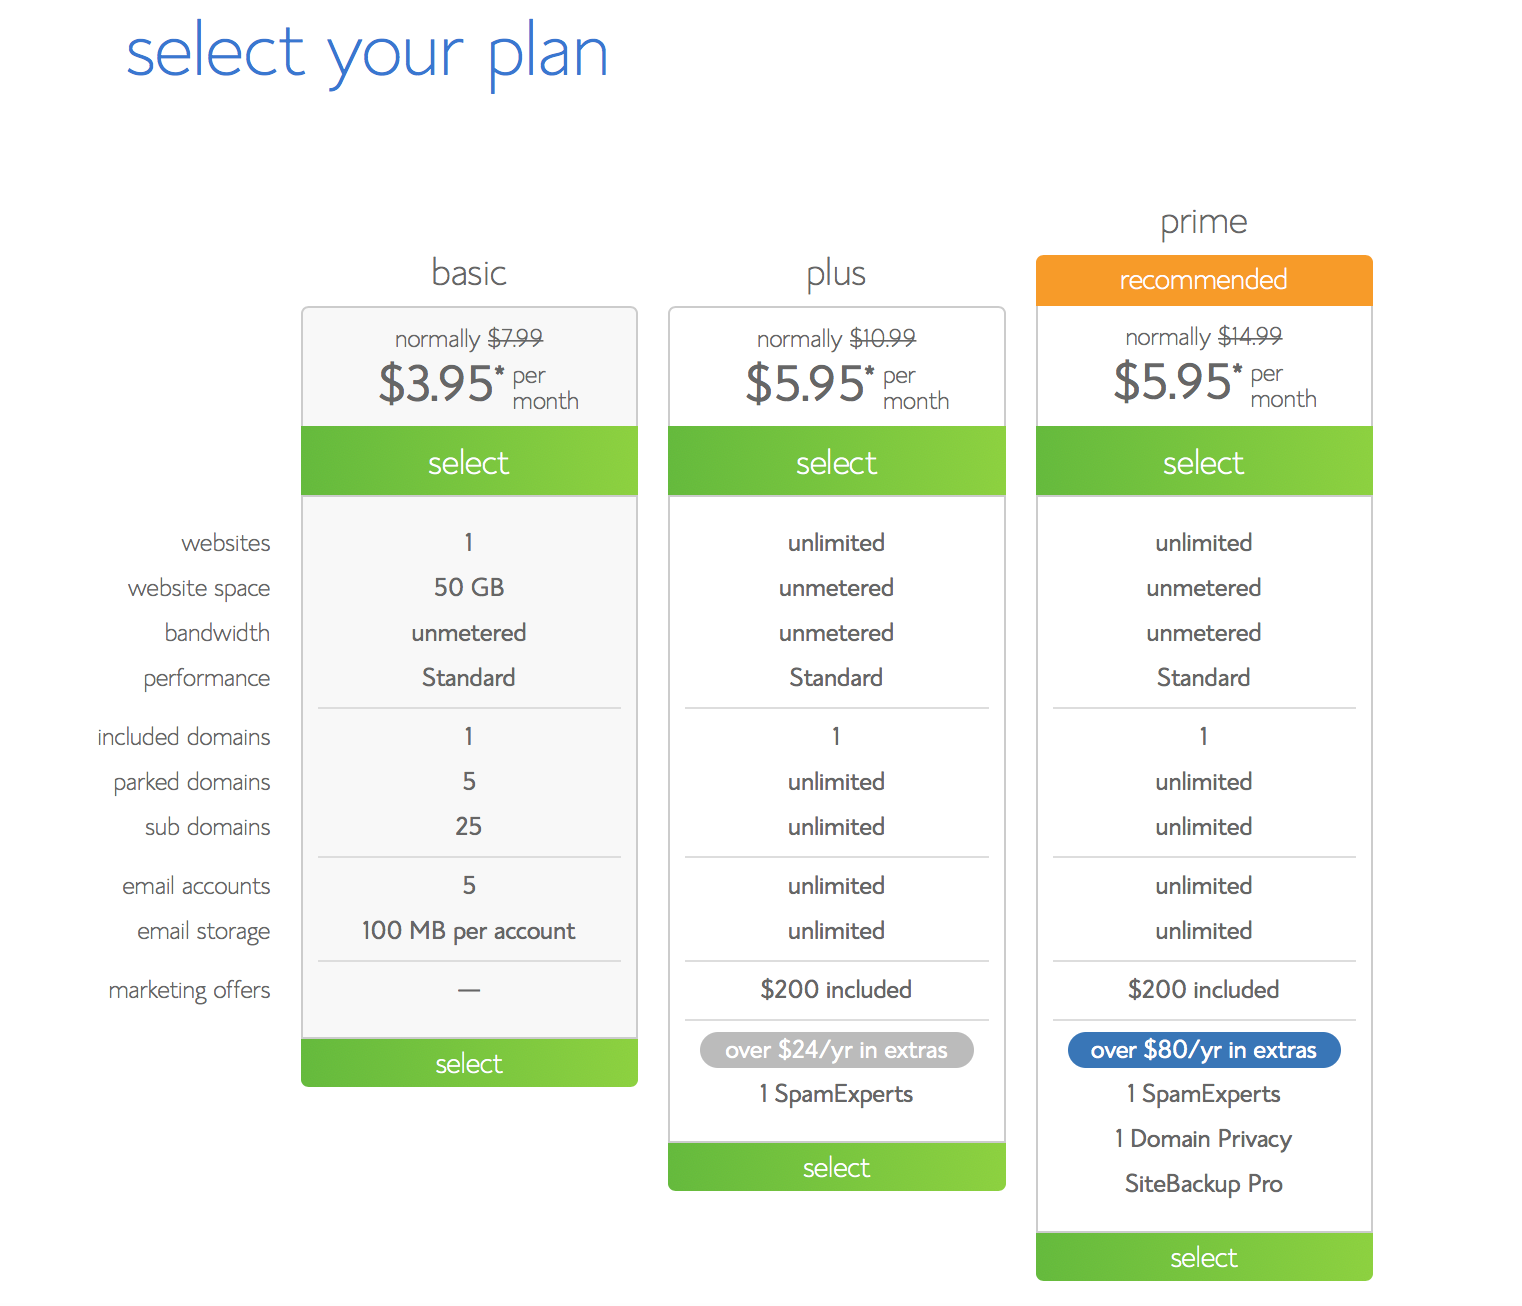
Select Your Plan
Even if you’re not just starting out I suggest the starter package if you’re only using this for your blog. You can later upgrade your plan if you create more websites.
After you’ve selected your plan you’ll be automatically moved to package information. Bluehost wouldn’t be a profitable company if they didn’t of course offer “Extras.” If you’re just starting and want to save money, you really don’t need any of the Extra Domain Registrations; your blog will work just the same without them. I added Site Backup Pro purely because I have the worlds worst luck at…well everything… and I wanted my site backed up somewhere else.
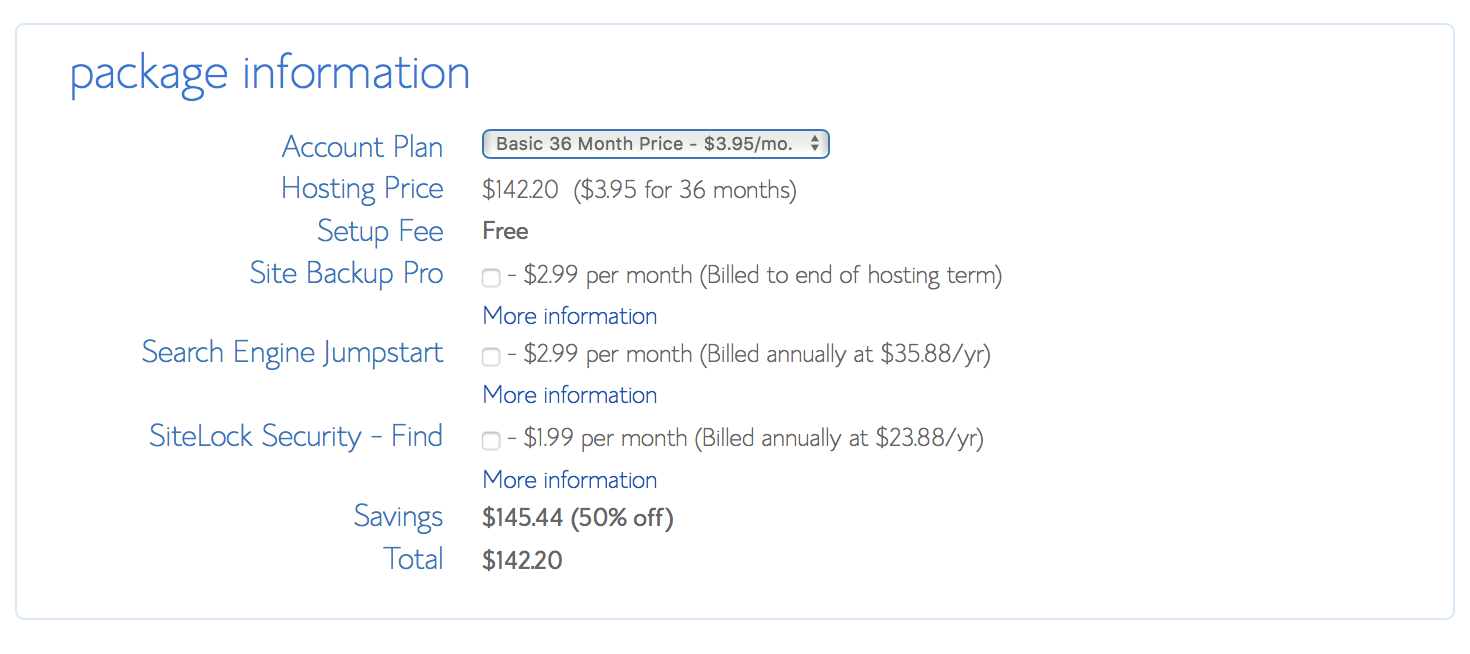
Please note: BlueHost charges you for the full 12 or 36 months amount upfront when you sign up. You will be pre-paying for hosting and that’s one of the reasons why they are able to offer such great hosting for the small price. I believe it’s totally WORTH it! Also, note that they have a money back guarantee if you are not satisfied with the service during a certain amount of time.
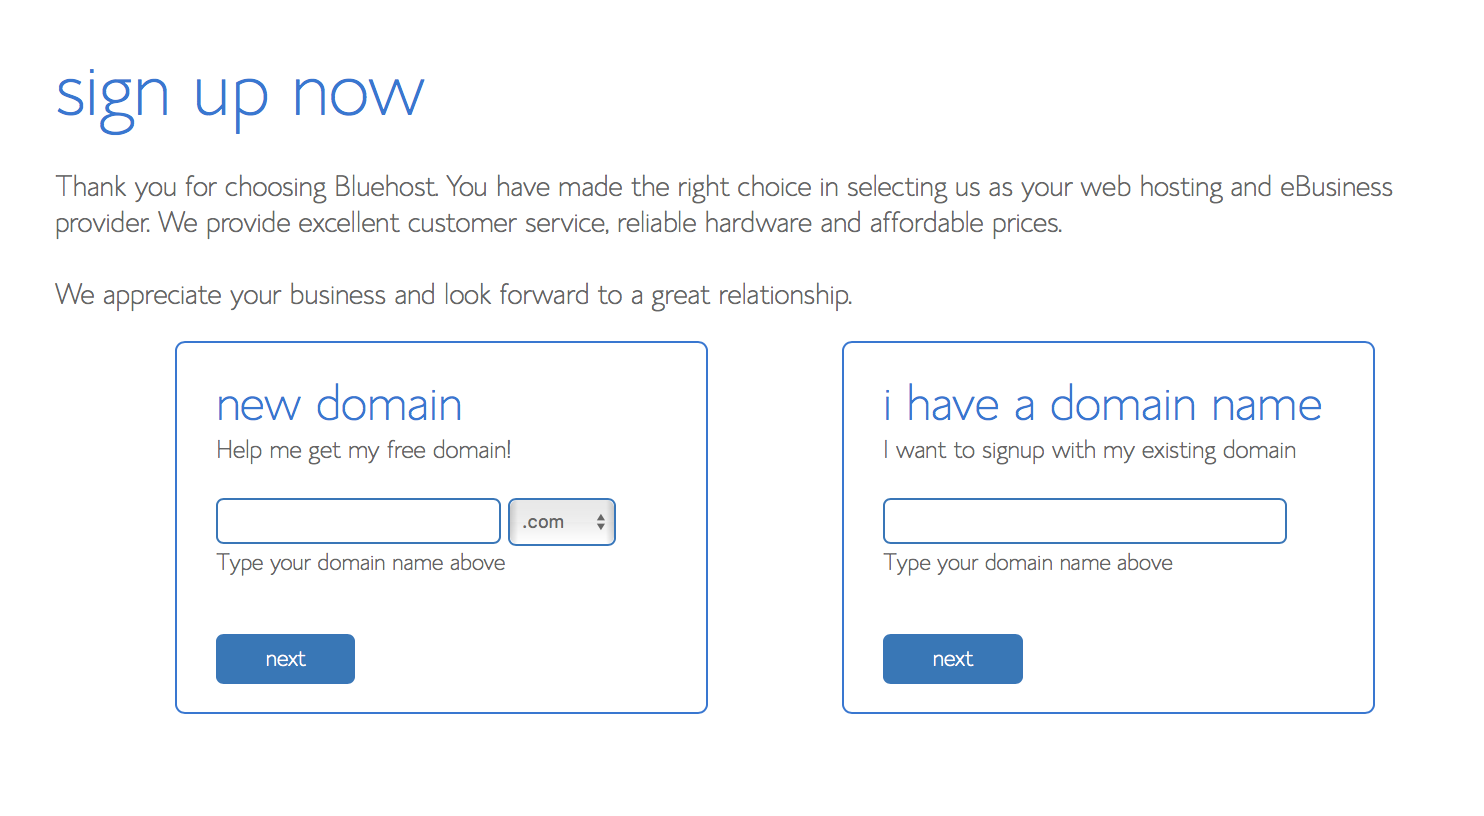
Some of you may have already started a blog elsewhere (wordpress.com, blogger, etc.) and some of you may just be starting. If you’re just starting you’re going to register your New Domain in the first box. They will proceed with super easy step by step directions for completing your domain registration.
If you’ve already created a domain name and you still want to use it you’ll choose the second box. Again really easy to transfer your domain name over, I transferred my URL host over to Bluehost to keep everything organized.
STEP #3
Connect domain and hosting
The best part about purchasing your domain directly through Bluehost is you can skip this step!
If you purchased your domain before signing up for hosting, from somewhere like GoDaddy or HostGator, you’ll need to connect your domain and hosting site. Your domain registration site will have a support page with step by step directions for setting your nameservers. Most will go something like this:
How to modify your domain’s DNS Nameservers when using Bluehost for your hosting:
- Select Manage Domains from the Domain Names drop-down menu.
- Select the domain name you wish to modify then click Set Name Servers.
- Enter your updated name server information (ns1.bluehost.com; ns2.bluehost.com) in the spaces provided under Name Servers heading and click Save Changes at the bottom.
STEP #4
Install WordPress
One of the best parts about Bluehost is there one click easy WordPress Installation built right into your hosting cpanel. Simply click hosting > cpanel > install WordPress. A window will pop up, click the green “START” button, make sure you’re using the correct domain URL you chosen, and click the green “INSTALL NOW” button. It will automatically begin installing on your computer.
You will receive an email with all the information you need (site URL, admin login URL, and username.) Make sure you save that and your password in a secure place!
STEP #5
Make it your baby!
Type in your admin login URL just like you would any other website. Log in to your new WordPress account and get started on the fun stuff! Here you can choose fun themes, learn about great plugins, and more. I hope this helps you get started on creating your amazing blog. If you have any other questions feel free to CONTACT ME!
You officially own your blog, Congratulations! Now what?
1. Design Your Blog
Let’s face it. Nobody wants to read poor writing and no one wants to continue exploring a site that it unattractive. Take the time to design your blog. Create a beautiful logo, choose a color scheme and install a theme you love and want to make your own.
2. Make Money!
- Affiliate Marketing
Affiliate Marketing is what most bloggers refer to as passive income. It is when a website owner includes referral links on their site to drive traffic to a retailer’s product or service. The retailer then pays the affiliate (website owner) a commission for all sales made from the traffic that came from their unique referral link. You simply sign up on the Affiliate Networks website for FREE then apply to companies individual Affiliate Marketing Programs that you trust and believe in. The Affiliate Networks I really enjoy using is:
ShareaSale: A huge hub for Affiliate Programs. I find a lot of fashion networks here.
Awin: Awin is a great Affiliate Network for bloggers just starting out because they don’t have high traffic requirements for applying.
MaxBounty: Great place to find competitive Affiliate Programs. They even assign you your own personal Affiliate Manager with specific contact information.
FlexOffers: FlexOffers has over 12,000+ Affiliate programs to work with and each account is assigned an account manager, making it easy to learn and use.
- Ad Placement
One of my favorite advertising companies to use for One Broads Journey is Media.net. Unlike most affiliate links, Media.net pays you per click on each ad. They provide a multitude of display options and tips on how to make more money.
- Sell Items
Most bloggers sell online courses, workbooks, etc. but don’t forget you can sell truly anything you like, it’s your blog! Try to stick to what your blog is about and what your readers come to learn about. If you write a blog about animals, you could sell your homemade dog treats. I write a lifestyle blog, therefore, I share my handcrafted home good products from Teluna, including pillows and clutches.
- Sponsored Posts
Izea: Offers easy opportunities for sponsored posts and sponsored social media posts.
Linqia: Great place to find sponsored posts.
- Resources Page
Creating a Resources Page is a great way to share with your readers a chance to look into your recommended services, products, and companies that work for you. As bloggers, we should all be here for each other. Think about if every blogger kept their success tips and tricks a secret? You wouldn’t have access to posts like this one of where in the world to begin. What a lonely world blogging would be if we all kept to ourselves. Having a resources page is a quick way to increase your affiliate income while being helpful to your readers. Check out my resources page here to see how to set one up.
Related Articles:
- How I quit my job and built two businesses
- How I Started A Company On My Own In 11months
- How I earn extra money each month with Ebates
- 12 Best Online Survey Sites To Join For Extra Money
- How I Earned My First $562.83 From Blogging
- How To Promote Your Blog With Bloglovin
- 22 Blogger Tips Proven To Work
- 10 Things To Check Before Hitting Publish


Comments are closed.